The Drop Times: DrupalCamp NJ Early Bird Pricing Ends Friday
Early Bird gets the worm. Now is the time to get a hold of your tickets and register for Drupal Camp NJ 2023.
One of Drupal's greatest features, and often mysterious underworking to many site builders and developers, are its caching layers especially render caching. We have all been there before: we have no idea why it's not quite working, so we press "Cache rebuild" (or more infamously, "Flush all caches" of the pre-Drupal 8 eras), and like magic, things are displaying properly. Whenever we have to resort to clearing the cache to fix a page, that usually means a render cache item was not properly invalidated when it was supposed to have been. This is caused by missing cacheable metadata. Cacheable metadata is the information Drupal uses to understand when a cache item should be invalidated by its tags or maximum age. It's also used to provide variations of the cache based on context.
It has been 10 years since the first Drupal Global Contribution Weekend (DGCW).
For this past decade, communities all around the globe have met on the last weekend of January for three days of fun, community, and contribution.
Despite the years, the spirit of the event hasn't changed. Everyone is welcome, including site builders, testers, designers, project managers, translators, marketers, writers, and, of course, developers. We truly had representatives from all these domains in the recent 2023 version of the event.
Where do you live? Where do you work? What language do you speak?
It doesn't matter because you will find a local event that fits your needs. And if you don't, we'll help you create one.
This year, DGCW was from Friday to Sunday, 27-29 January.
This year we saw participation from 3 continents, 7 countries, and 7 languages, with 8 locations in total.
And in line with the Drupal Community’s inclusivity mission, all events gave the ability to also join the team remotely.
Because meeting your local community is always great. Because working as one enriches us as human beings. Because working with peers strengthens you as a professional.
Because we come from the code and stay for the community. This event is the true litmus test since it has been running for so many years, and it's completely self-organised!
During the 3-day event, about 140 issues have been worked, 9 being on Drupal core issues queue and the rest between contrib and communities projects.
A total of 67 got fixed and 12 reached the status "Review and tested by the community", waiting to be merged and released.
At the moment, there are about 1.8k major issues on Drupal core queue. If we had a Global Contribution Weekend every week, we could clean that in about 5 months.
We hope the number of participants continues to grow in the next few years.
Organising an event is super easy. Have a look at this blog post from DCGW 2020 and check out the section "Interesting, but there isn’t anything close to me."
Thanks to everyone who joined, who organised, who wanted to join and couldn’t, and who will help with making the next Drupal Global Contribution Weekend - 26th to 28th of January 2024 - better and greater.
Join us on #global-contribution-weekend, #contribution-events, and #event-organizers Drupal Slack channels.
![]()
Italy: not only Drupal issues. We also discussed the PROs and CONs of DrupalSpoons compared with the new Gitlab integration. And we ate pizza, a lot of delicious pizza!
![]()
Germany: Our team is contributing to #Drupal from all over Europe. The first contribution happened at 9am and we have had many more since then. Here are photos from the kickoff call this morning.
![]()
Poland: Greetings from Wrocław, Poland :)
![]()
ECA team: while we haven't got a picture unfortunately, we've achieved quite a bit. 6 maintainers have been working on 17 issues of which 14 got fixed.
![]()
France: We didn't manage to get everyone on the pic, but here is the French community on our Saturday events (online+in Paris)
![]()
Ukraine: 50+ developers from all over Ukraine came to DevBranch office (the organizer) in Lutsk city for this initiative. We’ve been working on 137 issues, 77 of which are successfully completed so far.
![]()
Canada: Canada (Vancouver) team in action, smashing issues like superheroes.
Marketers are always seeking new ways to elevate website engagement and maximize interactivity. Yet, managing the countless third-party integrations and tracking tools implemented to enhance their business can quickly become overwhelming and chaotic. That's when Google Tag Manager comes to the rescue. With its intuitive and user-friendly platform, managing, updating, and tracking the snippets, tags, and integrations on your website has never been easier. From improving website performance to boosting conversion rates, Google Tag Manager offers the solution to streamline your digital marketing efforts and revolutionize your online presence.
Drupal 9 makes integrating with Google Tag Manager easy and effortless. The Google tag manager module in Drupal lets you quickly add, modify and remove tags on your website without touching any code! Read this easy step-by-step guide to learn how to integrate your Drupal 9 site with your Google tag manager.
Google Tag Manager is like a toolkit. It has all the tools you need meticulously organized in one place. Tools like Google Analytics, Adwords, personalization tools, A/B testing tools, Remarketing, Native advertising pixels, and much more. All the integration tags can be stored in Google Tag Manager for better access and management. How can it help, you ask?
Drupal 9 integrates seamlessly with Google Tag Manager and installing it is also a breeze. Now that we know how useful Google Tag Manager is, let’s move on to integrating it with your Drupal 9 website.
You can download the Google tag Manager module here.
Or run this command through composer with this command :
composer require 'drupal/google_tag:^1.4'
In the admin toolbar, go to Configuration-> System -> Google Tag Manager
Once you click on Google Tag Manager, you will see a container page like this –
Click on the Add container button. This is where you will add the Container ID that you had created previously when you signed up with GTM. If not done already, go here to signup and create a container ID for yourself (shown in the below steps).
Under Account setup, give the Account name and your Country name.
Under Container setup, give the Container name and select the target platform as per your requirements.
Click on the Create button.
Once done, you will be able to see a popup screen that will display the code snippet that needs to be pasted in the head section. Look out for the Container Id which will look like an alphanumeric word and begins with “GTM”. Here it is “GTM-MXQN9XL”. Copy this code to your clipboard.
Head back to your Drupal setup where you had to add the container ID. Give a name for your container in the Label field and paste the previously copied container ID in the Container ID field. Save the configuration.
To verify if the installation of Google tag manager has been successful in your Drupal site, go to the home page of your website and do an “Inspect Element”. If it has been installed properly, you should be able to see it within the tag.
Google Tag Manager is an extremely useful tool for site owners and marketers. Different third-party integrations can be maintained, added and modified easily. This greatly helps marketers in speeding up the process of experimenting and testing out various useful integrations that can lead to better user engagement. Drupal 9 comes loaded with plenty of powerful features and functionalities and tons of handy contributed modules that you can easily install and connect to. As a leading Drupal development company, we can help you build seamless digital experiences with Drupal. We’d love to talk to you!
Email Address Subscribe Leave this field blank Drupal Planet Drupal 9 Drupal 9 Module Drupal Development Drupal ModuleLeave us a Comment
Great Southern Homes, one of the fastest growing home builders in the US, sees greater results with Drupal
ExploreA reimagined digital solution for Abaco, a global leader in embedded computing systems for the defense industry
ExploreUpgrading the web presence of IEEE Information Theory Society, the most trusted voice for advanced technology
Explore View all Case StudiesKeeping a logbook is necessary for the correct operation of the system, so it is prudent to add an algorithm to the code. Thanks to this solution, changes will be made automatically, and all employees with the necessary level of access will have access to them.
Previously, to activate the function used, two protocols were offered by the software. Today we no longer have to face such difficulties because the new Drupal 8 has merged two options into one. Change notifications appear in the "Reports" section, allowing viewing of the content in the user interface. More details about how to log messages in Drupal 8 and Drupal 8 module development will be discussed in our material.
You don’t have to know a markup language such as HTML to create complex content on your digital platform.
Users and editors without coding experience can easily craft and update web content using a rich text editor – also called WYSIWYG. It’s pronounced wizz-ee-wig, and stands for What You See Is What You Get.
CKEditor 5 is the default WYSIWYG editor in Drupal 10, having been initially introduced in Drupal 9.3. Its powerful features make it far more than a mere update of CKEditor 4. In fact, CKEditor 5 was written completely from scratch to overhaul the content editing experience.
Let’s take a look at what you can expect from CKEditor 5 in Drupal and how to make the most of its core and premium features.
CKEditor’s user interface has undergone a serious makeover. It’s been greatly simplified and modernized with UI improvements to icons, toolbar items mechanics, interface colors, and the theme.
![]()
![]()
![]()
Three examples of UI display options. From left to right: Classic offers a fixed toolbar for distraction-free editing; Balloon comes with a floating toolbar so you can edit content in its real location; Inline displays the toolbar only when the editor is focused. Credit: CKEditor.
It used to be that adjusting embedded media and tables would bring up a dialog window that covered the content you wanted to format. These windows have been replaced with balloon panels that are much more intuitive, accessible, and mobile-friendly.
Creating and editing tables in CKEditor 4 was often a painstaking process. Content editors will be relieved to hear it’s a breeze in the newest version. You can insert, style, and adjust tables with just a few clicks. It’s also easy to copy and paste rows and columns.
![]()
The tables toolbar offers an efficient editing experience. Credit: CKEditor.
The style drop-down has been improved so that you can now see how each style will look before applying it.
![]()
Site admins can configure the styles available through CKEditor 5 in Drupal 10. Credit: CKEditor.
CKEditor 5 is more stable when it comes to creating complex lists. The improvements were based on a review of hundreds of scenarios relating to nested list items, including those with multiple blocks.
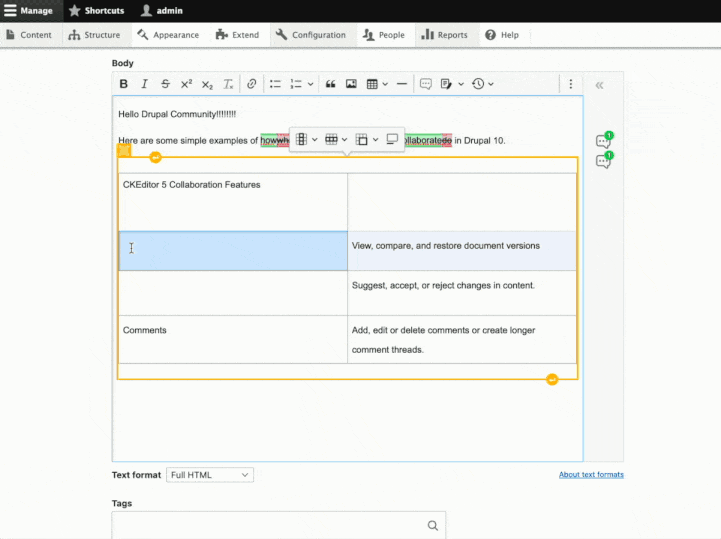
Adding the CKEditor 5 premium features module to Drupal 10 lets you use state-of-the-art solutions for collaborating and exporting content. It provides a Google Docs-like editing experience that gives you more control over your content and streamlines your editing processes.
When track changes mode is turned on, all your edits will be displayed as suggestions that can be accepted, discarded or commented on.
The sophisticated revision history feature allows you to see any changes made and who made them without having to leave the editor. You can also compare several revisions at once and restore previous versions.
You can now add comments to text and block elements such as images. Your team members can have discussions in threads and remove the comments when they’re done.
![]()
Check out the CKEditor 5 collaboration features demo. Credit: Drupal.
Multiple authors can now work simultaneously on the same rich text content. You can see at a glance which users are actively editing at any time.
You can now keep track of content changes by setting up notifications by email or writing a custom mechanism to get notifications via Slack.
With the click of a button, you can create a PDF or Word Document from content you’ve crafted in CKEditor 5. There is also a pagination feature that lets you see how your document will be laid out for printing.
![]()
CKEditor 5 lets you easily convert rich text content into a PDF. Credit: CKEditor.
MathType is now integrated with CKEditor 5. This feature allows you to display math equations and chemical formulas on your web pages. You can create keyboard shortcuts and save frequently-used equations and symbols. This could be a particularly useful tool for educational institutions.
![]()
The MathType integration lets you create various formulas in CKEditor 5. Credit: CKEditor.
Here are some exciting features that are soon to be integrated into Drupal 10 or in your Drupal version of CKEditor 5.
This allows you to edit content without having to click any toolbar buttons. Once it’s integrated into Drupal 10, you’ll be able to quickly create lists or format text simply by typing shortcuts.
![]() becomes a blockquote." data-entity-type="file" data-entity-uuid="65ddae15-8619-4c77-8c77-7015bf994793" src="https://evolvingweb.com/sites/default/files/inline-images/ckeditor5-autoformat-in-core.gif" width="777" height="353" loading="lazy" />
becomes a blockquote." data-entity-type="file" data-entity-uuid="65ddae15-8619-4c77-8c77-7015bf994793" src="https://evolvingweb.com/sites/default/files/inline-images/ckeditor5-autoformat-in-core.gif" width="777" height="353" loading="lazy" />
Try the autoformatting demo. Credit: Drupal.
You’ll soon be able to automatically create symbols with shortcut text, such as a copyright sign by typing (C). The transformations features can also be a great tool for introducing auto-correct rules.
Developers are currently limited to JavaScript if they want to write a plug-in for CKEditor. But CKEditor will soon deliver official TypeScript for the entire API.
Want more know-how? Master the fundamentals with our Drupal for Content Editors Training. You'll come away with actionable knowledge to implement improvements to your content processes, accessibility, consistency, and value.
//--> //--> + more awesome articles by Evolving Web